My photo
A lifetime passion in food and all things related to food!

Tuesday, 31 January 2012

Cauliflower Crust Pizza

I found this recipe on the web and thought I have to give this a go, and I'm pleased I did it is so good!! and the best thing is the entire crust is only 434 calories! a single slice of pizza is around 400 calories alone. With this cauliflower version, one serving is just 109 calories and tastes as good as the dough pizzas mmmmmm

Serving Size:              
2- 4 people

Ingredients

  • 1 cup cooked, riced cauliflower
  • 1 cup shredded mozzarella cheese
  • 1 egg, beaten
  • 1 tablespoon fresh chopped oregano (or 1 teaspoon dried oregano)
  • ½ teaspoon crushed garlic
  • ½ teaspoon garlic salt
  • olive oil (optional)
  • pizza sauce, shredded cheese and choice of your toppings*

Method:
  1. Preheat oven to 230*C. Spray baking paper with cooking spray/oil.
  2. In a medium bowl, stir together 1 cup cauliflower, egg and mozzarella. Add oregano, crushed garlic and garlic salt, stir. Transfer to the bake paper, and using your hands, pat out into a 9" round. Optional: Brush olive oil over top of mixture to help with browning.
  3. Bake at 230 degrees C for 15 minutes.
  4. Remove from oven.
  5. To the crust, add sauce, *toppings and cheese. Place under a grill at high heat just until cheese is melted.

*Note: Toppings ie bacon, onion etc need to be precooked since you are only grilling for a few minutes.

To "rice" the Cauliflower: Take 1 large head of fresh cauliflower, remove stems and leaves, and chop the florets into chunks. Add to food processor and pulse until it looks like grain. Do not over-do pulse or you will puree it. (If you don't have a food processor, you can grate the whole head with a cheese grater). Place the riced cauliflower into a microwave safe bowl and microwave for 8 minutes. There is no need to add water, as the natural moisture in the cauliflower is enough to cook itself. One large head should produce approximately 3 cups of riced cauliflower. The remainder can be used to make additional pizza crusts immediately, or can be stored in the refrigerator for up to one week.


Monday, 30 January 2012

School Lunchboxes (Summer)

In the warmer months it is important to think about what we are putting in the kids lunches there are a few basic tips to follow to ensure your kids lunch is fresh tasty and enjoyable rather than hot and soggy also kids eat less at lunchtime in summer (therefore I like to have a more substantial afternoon tea ready for after school)
Tips;
  • Use insulated lunchboxes with a small freezer block
  • Where possible freeze their drinks, water & juice boxes they will defrost in the lunchboxes naturally and be ready in time for lunch (keeping lunch and the kids cool).
  • Avoid using meat/fish in their sandwiches on days over 35* stick to spreads and or salads.
  • Deconstructed sandwiches are great in the heat if your child is old enough, simply provide all the prepared ingredients in small containers and they can make it up at lunchtime
  • Vege sticks and a dip or a mini cream cheese tub.
  • Frozen Grapes
  • Frozen Orange wedges
  • Cupcakes/Muffins individually wrapped and frozen – will defrost before recess.
  • Crackers and a small container with a mixture of cream cheese and Vegemite or simply buy the pre-made 'Kraft' cheesybite.
  • Flavoured rice cakes (plain rice cakes with a spread tend to be soggy by lunchtime so these are a great alternative - sun dried tomato and basil is a favourite).
  • Hummus and Salad wraps (make sure all lettuce leaves are very dry to avoid going soggy)
  • Muesli bars
  • Yogurt tubs or squeeze packs (frozen)
  • Trailmix - Dried fruits and or Nuts (if old enough) make your own mix and serve in small ziplock bags.
  • Summermix – Popcorn, chopped dried apricots, nuts (if old enough), sultanas, serve in a mini noodle box or ziplock bags.
  • Banana chips (available at health food store or aisle)
  • Dried Apple Slices or Apricots (available at health food store or aisle)
  • Popcorn in ziplock bags
  • Lots and Lots of Water!!
    Homemade Muesli Bars


Mini Apple & Oat muffins with a fruit cup


Vegemite "feet" sandwiches and fruit


Thursday, 19 January 2012

Summer

Why eat seasonally?

Produce that is in season locally is cheaper, tastes better and has more nutrients. Fruits and vegetables start to lose nutrients immediately after they are harvested, so the best produce is that which is the freshest. Produce that has been transported over long distances overseas or cross-country can not compete with locally grown produce for freshness, taste and nutritional value. 

Here is a list of local (Perth) produce available during summer - make the most of them at this time :)

Fruits
Season
Bananas
All Year
Paw paw
All Year
Nectarines
Summer
Strawberries
Summer
Passionfruit
Summer
Apples (Royal Gala)
Summer
Apricots
Summer
Cherries
Summer
Peaches
Summer
Plums
Summer
Grapes
Summer
Rockmelon
Summer
Watermelon
Summer
Mangoes
Summer
Avocadoes
Summer


Vegetables
Season
Broccoli
All Year
Cabbage
All Year
Carrots
All Year
Celery
All Year
Lettuce
All Year
Parsnips
All Year
Peas
All Year
Potato
All Year
Radish
All Year
Rhubarb
All Year
Silver Beets
All Year
Turnips
All Year
Beans
Summer
Capsicum
Summer
Chillies
Summer
Cucumber
Summer
Pumpkin
Summer
Sweet Corn
Summer
Tomatoes
Summer
Onions
Summer
Spring Onions
Summer
Squash
Summer
Zucchini
Summer
Beetroot
Summer


Chillies coming to life now summer is here


 Blooming right now in the garden.


Beautiful Perth summer day!!

Saturday, 14 January 2012

Apple Slice

When I saw this recipe (on a 4ingredients site) using sour cream I was not too impressed although upon making it, wow it's great!! a lovely buttery base with a light apple topping great for entertaining or an afternoon tea on a budget, with a home brand cake mix and the apples on special, I made this slice into 9 servings for only $4.60! could easily be cut into 12 squares.

Ingredients
  • 1 pkt Vanilla Cake Mix
  • 1/2 cup Melted butter
  • 400g drained tinned apples
  • 200g  Sour Cream

(I use Sunflower margarine and light sour cream.


Method
  1. Combine melted butter with cake mix until a soft dough forms,
  2. Press into lined square tin
  3. Bake for 20 mins
  4. Combine apples and sour cream
  5. add to base and bake for further 20mins
  6. Let cool then refrigerate till cool.
  7. Serve with sprinkled cinnamon


Wednesday, 11 January 2012

Banana & Orange Cakes

A delicious light banana sponge cupcake with a soft gooey orange surprise!


Ingredients

100g Unsalted Butter/Margarine
2 eggs
165g Sugar
200g S/R Flour
125mls Milk
1 tsp Vanilla
1 Banana
1/2 jar Marmalade


Method:
  1. Cream butter and sugar with an electric mixer/beater,
  2. Add one egg at a time then reduce speed and add the vanilla,
  3. Mix in the (mashed) banana, the flour then the milk, when all combined
  4. Spoon the mix into patty cases till they cover the bottom and no more than half way up,
  5. Drop a tsp of marmalade to the centre of each case, then top with remaining mix.
  6. Bake at 180* for 25-30 mins or until slightly golden.
  7. Allow to cool then dust with icing sugar or serve plain.


Friday, 6 January 2012

Raspberry & Mango Pops

Ingredients

250g Raspberries
250g Mascarpone
2 Mangoes
1 tsp Vanilla essence
3 tsp Icing Sugar


Blend and sieve Raspberries, to this add 125g mascarpone,1 tsp icing sugar and 1/2 tsp vanilla mix well and add to the bottom of your pop holders.

Blend 2 mangoes (4 mango cheeks) to this add 125g mascarpone, 2 tsp icing sugar and 1/2 tsp vanilla mix well and add to the top off the raspberry mix.

Freeze overnight and serve

Makes 6-8

Wednesday, 4 January 2012

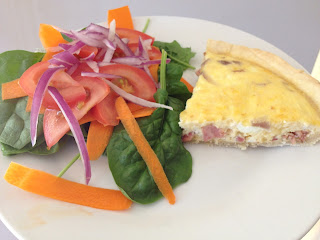
Quiche

Crust Ingredients
  • 1 cup flour
  • 1/2 teaspoon salt
  • 1/4 cup olive oil or canola oil
  • 1/4 cup iced water
(a pinch of cayenne pepper or a small amount of Parmesan cheese adds great flavour)

Method
  1. Mix flour and salt with fork.
  2. Beat oil and water with whisk to thicken.
  3. Pour into flour and mix with fork.
  4. Press into 22cm pie crust tin (I prefer to roll mine out and lay in into the tin, using a knife to remove the excess)

Filling Ingredients (suggested)
  • 5 large eggs
  • ¾ cup milk
  • 2 cups of........ Chopped Bacon/Cheese/Deli Meats/Mushrooms/Zucchini/Antipasto Mix etc etc

Method
  1. Gently whisk eggs and milk together,
  2. Stir in desired topping, (a favourite of ours is a mixture of gently sauteed onion, bacon and mushroom, (allowed to cool) this makes up about 1 ¾ cup the remaining ½ cup we fill with grated cheese.
  3. Add mixture to prepared crust and bake for 40 – 45 mins at 200 *C until golden and or a knife can be inserted and removed cleanly.
  4. Serve with your favourite salad.