My photo
A lifetime passion in food and all things related to food!

Wednesday, 26 October 2011

Apricot Chicken Curry


Serves 4
Ingredients:
  • 1/4 cup plain flour
  • 1kg skinless chicken pieces or drumsticks,
  • 2 tablespoons olive oil
  • 1 large brown onion, peeled, finely chopped
  • 2 garlic cloves, crushed
  • 1 cup chicken stock
  • 1 teaspoon cumin Powder
  • 2 teaspoon curry Powder
  • 405ml can apricots in natural nectar (seperate apricots from nectar)
Method:
  1. Place flour and salt and pepper in a shallow dish. Lightly coat chicken pieces in seasoned flour, shaking off excess.
  2. Heat 1 tablespoon oil in a deep, large, heavy-based pan over medium heat. Cook chicken, in batches, for 2 to 3 minutes each side or until golden. Transfer to a plate. Repeat with remaining chicken and oil. Cover and set aside.
  3. Add onion and garlic to frying pan. Cook, stirring occasionally, for 3 to 4 minutes or until tender. Sprinkle Cumin and Curry powder over onion and stir until well combined.
  4. Stir in apricot nectar and chicken stock. Bring to the boil. Reduce heat to low. Return chicken to pan. Cover with a lid. Cook for 20 minutes. Remove cover and add apricots, pushing them into the sauce. Cook, uncovered, for a further 20 to 25 minutes or until chicken is cooked through and sauce has thickened.
  5. Serve with Rice


Tuesday, 25 October 2011

Mushrooms on Toast

Serves: 2
Ingredients
  • 2 thick slices of sourdough bread or similar, grilled, fried or toasted
  • 25g unsalted butter
  • 2 Cloves Garlic peeled and finely chopped
  • 200g mushrooms, of your choice
  • 3 tablespoons of white wine
  • Flat-leaf parsley washed and roughly chopped
  • Salt & Pepper
  • Olive Oil
Method
  1. Heat a large pan and melt the butter into the pan and as soon as it starts to sizzle add the mushrooms and cook over a high heat for about 3-4 minutes until cooked evenly on all sides.
  2. Splash in a little white wine and allow it to evaporate and then add the garlic and the parsley.
  3. Drizzle a little of your favourite olive oil on the toasted bread and then arrange the mushrooms on top and serve immediately.
Hint: If you don't have white wine then balsamic vinegar is a great alternative


Wednesday, 12 October 2011

Oreo Balls

Ingredients:
  • 2 pkt's Oreo biscuits
  • 200g Cream Cheese (Philly) room temp
  • 200 - 250g Chocolate (White or Milk)

Method:
  1. Crush the Oreo's in plastic bag with something hard (a rolling pin works well);
  2. Pour crushed Oreo's in large bowl and mix through cream cheese until dough forms,
  3. Roll into small balls, placing on bake paper lined tray in the fridge for 10 -15 mins to become firm;
  4. Heat chocolate in microwave bowl until warm and stir until melted;
  5. Using toothpick to dip biscuits balls into melted chocolate and return to paper lined tray to set.

Hints: Oreo''s are great although most cream filled biscuits will work just as well, use Milk, Dark or White chocolate of your choice or a combination to cover, they taste even better the next day :)

Tuesday, 11 October 2011

Gingerbread Cookies

Ingredients:
  • 125g Butter, melted
  • 2 tablespoons Honey
  • 185g Brown Sugar
  • 1 Egg, beaten
  • ¼ teaspoon Salt
  • 1/2 teaspoon Baking Powder
  • 2 teaspoons Ground Ginger
  • 200g S/R Flour
  • 150g Plain Flour (plus a little extra for rolling out the dough)
Method:
  1. In bowl combine Butter, Honey, Egg and Sugar,
  2.  Stir through Flours, Baking Powder, Salt & Ginger to form a dough,
  3. Wrap the dough in plastic and rest in the fridge for 10 -12 mins,
  4. Flour counter top and rolling pin then roll the dough out to about 1 cm thickness, using a cookie cutter, cut cookies out and place on bake paper lined tray,
  5. Bake at 180* (or 165* fanforced) for 10 – 12 mins until pale golden brown remove and let cool for 5 mins before transfering to a wire rack to cool completely.
  6. Decorate with your favourite icing or just dust with icing sugar.


Let the kids have fun decorating them!


Sunday, 9 October 2011

Mini Choocolate Cakes

Ingredients:
  • 100g Butter
  • 165g Caster Sugar
  • 2 eggs
  • 200g S/R flour
  • 125mls milk
  • 1 teaspoon of vanilla
  • 1 tablespoon Cocoa Powder (or whatever flavour you like) 
Melthod:
  1. Cream butter and sugar together with electric mixer until pale and smooth,
  2. Mix in 2 eggs (one at a time),
  3. Add the Cocoa to the flour and then fold flour into the mix along with the milk, beat on slow till combined,
  4. Divide into 24 mini muffin cases.
  5. Bake 160* (fan forced) – 180* oven for 12- 15 mins
  6. Cool on wire rack.
Hint: Use an electric mixer for best results, flavour can be changed to your own taste, for example remove cocoa and replace with grated apple and a teaspoon cinnamon, add chocolate chips, chopped cherries or just plain vanilla.
 
Can be made into 12 Cup-Cakes or a whole cake.


Saturday, 8 October 2011

MIni Meatballs

Makes 24 – 30 approx

Ingredients:

  • 600g Lean Beef Mince
  • 1 egg
  • ½ cup breadcrumbs (fresh is best)
  • 1tablespoon bbq sauce
  • 1tablespoon tomato sauce
  • 1 garlic clove, crushed (optional)
  • Salt & Pepper
  • ¼ - ½ cup oil for frying (Sunflower, Canola, etc)

Method:
  1. In a large bowl thoroughly combine all the ingedients (expect the Oil) and roll into small balls.
  2. Rest on a plate in the fridge for about for 20mins to the the meatballs firm up a little.
  3. In a frypan add the Oil till it just covers bottom of the frypan and shallow fry (on med – hign heat) the meatballs turning occassionaly, until firm and brown, (do not over crowd the pan of the meatballs will stew and not fry, if need be cook in batches.
  4. Serve warm or cold with a good tomato sauce or dipping sauce, for a party of make slightly larger ones and serve over spaghetti with a tomato based pasta sauce.
Hint: you can add ½ grated onion and or grated carrot, finely grated cheese, or spice it up with 1-2 tbsp chilli sauce. Bottom line is play the recipe and you will be surprised how easy it can be to have a great party or dinner hit!!

*if you don't want to use an egg replace it with a piece of bread soaked in milk!


Thursday, 6 October 2011

Lemon Curd (Lemon Butter)

Lemon Curd
Ingredients:
  • 1 cup white sugar
  • 3 eggs
  • 1 cup fresh lemon juice
  • 3 lemons, zested
  • 1/2 cup unsalted butter, melted

Method:

  1. In a microwave-safe bowl, whisk together the sugar and eggs until smooth.
  2. Stir in lemon juice, lemon zest and butter.
  3. Cook in the microwave for one minute intervals, stirring after each minute until the mixture is thick enough to coat the back of a metal spoon.
  4. Remove from the microwave, and pour into small sterile jars. Store for up to three weeks in the refrigerator.


Wednesday, 5 October 2011

Beef Stroganoff

Beef Stroganoff

Serving Size:
4 - 6 people

Ingredients:

  • 125g fresh mushrooms, sliced
  • 1 medium onion, chopped
  • 45g butter (we use Olive Oil Spread)
  • 680g lean beef thinly sliced
  • 25g plain flour
  • 355ml beef stock
  • 170 g light sour cream
  • salt and black pepper to taste
Method:
  1. In a large pan, sautee mushrooms and onions in 2 tablespoons of butter over medium heat until soft; remove from pan.
  2. Using the same pan, melt remaining butter. Cook sliced beef in melted butter until browned.
  3. Mix in flour. Cook for further 1-2 mins, stir in beef stock, and cook until slightly thickened.
  4. Return mushroom and onion mixture; stir in sour cream. Season to taste with salt and pepper. Continue cooking until sauce is hot, but not boiling.
  5. Traditionally served over egg noodles but we prefer rice or mashed potato!

Chopping Boards - which is best?

Plastic vs. Wood Chopping Boards

Ever wondered which out of plastic or wooden chopping boards is better?
Wooden chopping boards have been proven to be more hygienic than plastic chopping boards due to the fact that wooden boards have a natural tannin in them that acts as an anti-bacterial agent, they also draw the bacteria down under the surface where it trapped. They are also less likely to dull your knives. When using plastic chopping boards, the blade of the knife can create tiny cuts and grooves on the surface, and the bacteria can get caught in these crevasses and tiny fibres. Once they are there, there is no way of removing them.
Chopping boards are an essential part of any kitchen, so here are some tips on how to best clean and maintain your chopping boards.

General Chopping Board Tips:

There are some general tips that are useful for cleaning and maintaining chopping boards, no matter what type you choose to use:
  • Never put ready to eat food such as salads, breads etc, on a chopping board that has had raw meat on it previously, unless it has first been thoroughly washed.
  • Always prepare meat on a separate chopping board where practical. Ideally, chicken, seafood, and red meats will be prepared on different boards.
  • A separate chopping board for garlic and onion is a good idea too, as these are strong flavours which may effect the flavour of other foods.
  • Colour code your chopping boards – this can be done using coloured string around the grip rather than using different colours of plastic boards.
  • Glass and marble chopping boards look fantastic and are very hygienic but they will quickly dull your knives. Best left as heat mats for your hot pans!
  • Store chopping boards in a rack. This will allow the air to freely circulate around them.
Maintaining Wooden Chopping Boards
Wooden chopping boards do require special cleaning and maintenance to keep them in top condition. Never put your wooden chopping board in the dishwasher as the water and the heat will cause the glues to deteriorate.
Wooden chopping boards should be scrubbed after use with hot, soapy water, before rinsing them, wiping them off and allowing them to dry completely.
A paste of baking soda and water can clean and deodorise a wooden board, while bicarb soda and lemon juice is a fantastic way to remove stains and disinfect boards. It is enough to physically scrub the board as wood has been proven to be naturally antibacterial.
The board should be oiled monthly using a neutral vegetable oil such as grape seed oil or olive oil. This will keep the board in great condition. Always replace boards that have visible cracks as the cracks retain possible bacteria.
Maintaining plastic chopping boards (if you choose to use one)
Plastic chopping boards if possible are best if they can be placed in the dishwasher, where the hot rinse cycle will kill bacteria. If you don’t have a dishwasher, scrub the board thoroughly with hot, soapy water, before rinsing and allowing to dry.
To clean and deodorise a plastic board, use one teaspoon of bleach to one litre of water. Saturate the surfaces of the board and allow to stand for five minutes before rinsing and drying.


White Button Mushrooms help prevent Breast Cancer

I found this out about this and thought it too important not to share:

For heaps more info go to www.pinkribbon.org

NEW YORK (Reuters Health) - Eating a few ounces of mushrooms every day could help prevent breast cancer, a new study suggests.

"You don't need a strong effect to cause cancer prevention. Eating 100 grams or even less of mushrooms per day could have an effect on preventing new breast cancers," Dr. Shiuan Chen of the Beckman Research Institute of the City of Hope in Duarte, California, the study's lead author, said in a press release accompanying the study.

Extracts of the fungi interfere with the action of aromatase, an enzyme that helps the body make estrogen, the researchers explain in the medical journal Cancer Research. Most breast tumors require estrogen to grow.

Chen and her colleagues tested seven vegetable extracts for their aromatase-blocking activity, and found that white button mushroom had the strongest effect. The researchers evaluated 10 other types of mushrooms, and found stuffing mushrooms, portobello, crimini, shiitake and baby button mushrooms also inhibited aromatase activity.

Because white button mushrooms are the most commonly eaten type, the researchers tested extracts of the mushrooms in a series of laboratory and animal experiments.

The extract reduced the proliferation of breast cancer cells in a lab dish, while feeding the extract to mice implanted with breast cancer cells suppressed tumor growth, Chen and her team report. Further experiments showed that linoleic acid, a fatty acid usually found in meat and dairy products, was probably responsible for the extract's anti-cancer effects.

Based on the amount of extract used in the experiments in mice, about 100 grams of mushrooms daily would be enough to prevent breast cancer growth, Chen and her team state, adding that it is possible that eating even less every day could be effective.

"Results from this and other laboratories support the hypothesis that white button mushrooms may be an important dietary constituent for reducing the incidence of hormone-dependent breast cancer in women," they write. "Prevention strategies involving mushrooms are readily available, affordable, and acceptable to the general public."

SOURCE: Cancer Research, December 15, 2006

Tuesday, 4 October 2011

Kids - Play Doh

Play Doh Recipe

Ingredients:
  • 1 cup plain flour
  • 1 cup water
  • 1/2 cup salt
  • 1 tablespoon of oil - (any oil will do, even baby oil)
  • 2 tablespoons of cream of tartar
  • 2 -5 drops food colouring

Method:
  1. Mix all the ingredients into a pan and blend with a whisk.
  2. When all ingredients are blended, place the pan on the stove on medium to medium-high heat.
  3. You will need to mix continually until the mixture thickens. About 3 to 4 minutes.
  4. When the mixture starts to clump and is difficult to mix, take the pan off the stove.
  5. Pour the dough on a floured surface and when it is cool enough to handle start kneading (like bread dough).
  6. Remove from the floured surface when the dough is no longer sticky. Knead away from the floured surface until all the flour on the dough is absorbed and the dough is smooth and pliable.
  7. When totally cool store in plastic wrap or an air tight container.
  8. Start playing!!!

Sunday, 2 October 2011

Kiwi Squares

Ingredients
  • 11/4 cups Flour
  • 1/3 cup icing sugar, (¼ cup for mix, rest for top)
  • ½ cup butter
  • 1 cup sugar
  • 2 kiwifruit, peeled and purÄ—ed (1 peeled and sliced into 9 for deco, optional)
  • 2 eggs, beaten
  • 1 teaspoon lime juice
  • ½ teaspoon grated lime peel
  • ½ teaspoon baking powder

Method:

  1. Combine flour and ¼ cup icing sugar; cut butter into flour mixture until mixture looks like cornmeal. Pat into lined 9-inch square pan. Bake at 220°c for 15 mins.
  2. Combine sugar, kiwifruit puree, eggs, lime juice, lime peel and baking powder; pour over baked crust.
  3. Return to the oven. Bake for 25 more minutes. Cool; sprinkle with remaining powdered sugar.
  4. Cut into 16 squares for small bite size pieces of into 9 if you want to top with a slice of kiwifruit.


Thursday, 29 September 2011

Kids - Corn Fritters

Corn Fritters
These are great for kids snacks but for an adult version I like to add 1/4 cup of chopped chives to the mix and a nice big pinch of salt...  Enjoy!!
Ingredients
  • 1 cup Self-Raising Flour
  • 1/2 cup milk
  • 2 eggs
  • 420g can corn kernels, drained
  • 1 tbsp melted butter
  • Oil
  • chutney and or tomato sauce, to serve
Method
  1. Sift flour into a large bowl. Season with salt and pepper. Stir until well combined. Make a well in the centre.
  2. Whisk milk, eggs and melted butter in a jug. Add to flour mixture with corn kernels. Using a large metal spoon, gently fold ingredients together until combined (don't over mix).
  3. Preheat oven to 150°C. Heat a non-stick frying pan over medium heat. When hot, remove from heat. Add some oil. Return frying pan to heat. Add heaped tablespoonfuls of mixture, 3 at a time.
  4. Cook for 2 minutes or until bubbles appear on surface. Turn. Cook for a further 2 minutes or until fritters are firm to the touch. I like to keep them warm in oven while cooking remaining fritters. Serve with chutney or sauce.

Wednesday, 28 September 2011

Party Finger Food

Roasted Red Capsicum Dip

Ingredients:


  • 4-5 Red capsicums
  • 200g Cream Cheese
  • 200g Australian Feta Cheese
  • 50mls Olive Oil
  • 3 Garlic cloves
  • ¼ tsp Chili powder
  • 1-2 tsp Salt
  • 4-5 Fresh mint leaves (optional)
Method:
Cut the flesh off the capsicum and discard the seed core. Lay the capsicum pieces skin side up under the griller and grill until the skins are blistered and blackened. Transfer the capsicum pieces to a plastic bag and cool. When cool, open the bag, peel off the skins and place the capsicum pieces in a food processor (discard the skins).
To the processor also add the peeled garlic, oil, feta cheese, salt, cream cheese and chili powder and blend until well mixed. A popular option is to fold through the chopped mint leaves by hand and add more salt if necessary.

Serve with veg/bread sticks or corn chips!


Party Meatballs
Makes approx 20 meatballs

Ingredients

  • 1 kg beef mince
  • 1/2 cup dried bread crumbs
  • 1/3 cup chopped onion
  • 1/4 cup milk
  • 1 egg
  • 1 teaspoon salt
  • 1/2 teaspoon Worcestershire sauce
  • 1/8 teaspoon ground black pepper
  • 1 jar tomato-based chili sauce (if not available, use pureed tomato jar and add chili sauce to taste)
  • 1 1/4 cups grape jam (plum jam also works well)
  • ¼ cup Oil
Directions
  1. In a large bowl, combine ground beef, bread crumbs, onion, milk, egg, salt, Worcestershire sauce, and ground black pepper. Mix together, and shape into meatballs. (refrigerate for 30mins)
  2. In a large Fry pan, heat oil over medium heat. Add meatballs, and cook until browned, about 5 to 7 minutes. Remove from skillet, and drain on paper towels.
  3. Add chili sauce and jam to saucepan; heat, stirring, until jam is dissolved. Return meatballs to skillet, and stir until coated. Reduce heat to low. Simmer, uncovered, for 30 minutes.
  4. Serve hot with cocktail sticks.


Glazed Chicken Wings
Ingredients:
  • 12 chicken wings
  • 1/2 cup barbecue sauce
  • 1/2 cup honey
  • 1/2 cup soy sauce
Method
  1. Cut chicken wings into three sections; discard wing tip section. Place in a greased 13-in. x 9-in. x 2-in. baking dish.
  2. Combine barbecue sauce, honey and soy sauce; pour over wings.
  3. Bake, uncovered, at 220* for 50-60 minutes or until chicken juices run clear.


Guacamole

Ingredients:
  • 6 ripe avocados
  • 3 limes, juiced
  • 1 medium yellow onion, chopped
  • 1 garlic clove, smashed then minced
  • 2 green chillies, cut into rounds (remove seeds if you don't want it too hot)
  • 1 big handful fresh coriander with stems, about 1/2 cup, finely chopped
  • Olive Oil
  • Salt & Pepper

Method:

Halve and pit the avocados. With a tablespoon, scoop out the flesh into a mixing bowl. Mash the avocados using either a fork or potato masher, leaving them still a bit chunky. Add the remaining ingredients, and fold everything together. Drizzle with a little olive oil, adjust seasoning with salt and pepper and give it 1 final mix with a fork.
Lay a piece of plastic wrap tight on the surface of the guacamole so it doesn't brown and refrigerate for at least 1 hour before serving.


Hint: keep the avocado seed in the dip until serving, it stops the avo turning brown :)


Tuesday, 27 September 2011

Bacon Risotto

Bacon Risotto
Serving Size:
4 people

Ingredients:
  • 1/2 Kg bacon, diced
  • 5 cups chicken stock
  • 2 tablespoons butter
  • 1/2 onion, diced
  • 2 cloves garlic, minced
  • 1 1/2 cups Arborio rice
  • 2 tablespoons butter
  • 1/4 cup grated Parmesan cheese
  • salt and black pepper to taste

Method

  1. Cook and stir the diced bacon in a large skillet over medium heat until browned, about 10 minutes. Drain the bacon and reserve.
  2. Bring the chicken stock to a boil in a saucepan over high heat; reduce heat to low to keep the chicken stock hot.
  3. Heat 2 tablespoons butter in a large, heavy-bottomed saucepan over medium-high heat. Add the onion and garlic; cook and stir until the onion begins to turn golden brown at the edges, about 2 minutes. Pour in the rice and stir until the rice is coated in butter and has started to toast, 2 to 3 minutes. Reduce heat to medium; stir in one-third of the hot chicken stock and continue stirring until the rice has absorbed the liquid and turned creamy. Repeat this process twice more, stirring constantly. Stirring in the broth should take 15 to 20 minutes in all. When finished, the rice should be tender, yet slightly firm.
  4. Remove the risotto from the heat and stir in the remaining 2 tablespoons of butter, the Parmesan cheese, and the reserved bacon. Season to taste with salt and pepper before serving.

Hints: Stock must be HOT and a cup of frozen peas is great thrown in five mins before the end.

Herbs - Coriander

Coriander

Cilantro and coriander come of one and the same plant, a pretty annual herb with feathery leaves and large white umbrella flower heads. The name cilantro refers to the fresh leaf, also known as Chinese parsley. Coriander is the name for the seeds.  Not only is it a wonderful herb to cook with as the roots, stem and leaves can all be used in different ways, but it is fantastic for your body!

Cilantro/Coriander has 11 components of essential oils, 6 types of Acids, Minerals and Vitamins (inc vitamin C) also contains Cineole which posses anti-rheumatic and anti-arthritic properties effective in reducing swelling and water retention.   Some of the acids contained in coriander help to reduce cholesterol, and the oils Borneol and Linalool aid digestion and proper liver function, whilst the anti bacterial oil Citronelol acts as an antiseptic and anti-microbial in the healing of mouth ulcers. 

Coriander also contains Iron in a direct source for anaemic’s and for digestion aids in the proper secretion of enzymes and digestive juices in the stomach.

Coriander also aids in the proper secretion of hormones to reduce PMS and Period pain, the anti-oxidants in coriander also help prevent aging of the eye and soothes against eye stress.


How to grow coriander
Coriander needs a frost free period to grow but it doesn't like extreme heat. So in milder climates you grow coriander during summer, in tropical climates you grow it during the cooler dry season.
To grow coriander you need reasonable soil and you need to keep the plants well watered.
Growing cilantro/coriander from seed
You can plant coriander in rows for easy harvesting or you can spread the seed over a wider area and rake it in. It depends how much seed you have available.
You want about 5 cm between plants if you grow coriander for the leaf. They need more space if you grow them for seed, but you can always eat the extre plants and just leave a few to go to seed.
coriander seeds take about two to three weeks to germinate. If they come up too thickly, just pull up and eat the extras...
Harvesting cilantro/coriander
After you have eaten all your thinnings, harvest individual coriander leaves of the base of the remaining plants. Just make sure the plant is big enough to cope and leave some leaves on it so it can continue to grow.
Sooner or later your coriander plants will flower. Once they start developing that flower stalk they stop making more leaves. Therefore it is a good idea to re-sow coriander every few weeks during the growing season. That way you never run out.
Some people also chop out the flower stalk as soon as it shows and manage to keep the plants going a bit longer. Or they harvest the whole coriander plant once it shows signs of wanting to flower.
Apart from that coriander has no special soil requirements. Rich, dark soil always produces the biggest, healthiest plants, but any reasonable soil with average nutrient levels should be fine. If you want to feed your plants extra, some diluted liquid fertilizer like fish emulsion never goes astray.
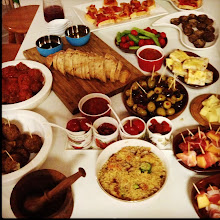


Sunday, 25 September 2011

Kids - Muesli Bars

Muesli Bars

These are so easy to make, you can add whatever dried fruits or nuts you desire, they can be made to suit any taste and think not only of the money you will save on pre packaged muesli bars, but these have no additives, preservatives or any of the nasty numbers we're all trying to avoid.... These bars are fantastic for school lunch boxes, a quick brekky on the go, picnic or after sport snacks or just with a cuppa... Enjoy!...


(Makes 18 medium bars)

 Ingredients
  • 1 1/2 cups Rolled (quick) Oats
  • 1 cup desiccated Coconut
  • 3/4 cup Dried Apricots (Chopped)
  • 3/4 cup Sultanas
  • 125g Butter
  • 1/3 cup Honey
  • 1/3 cup Brown Sugar
Method

In a medium saucepan over medium heat simmer butter, sugar and honey until combined and frothy (Approx 5mins)

In a large bowl mix all dry ingredients together then slowly pour in hot honey mix and stir with a wooden spoon till all combined,
Press the mix into a pre-lined rectangle dish and refrigerate till firm (1-2hrs) then remove and cut into rectangles.  Store for up 10 days in an airtight container in the fridge.


Tuesday, 20 September 2011

Top Ten Additives List - to avoid!!

Fantastic Iphone app!
Keep these numbers near your shopping list
 
102
104
110
123
124
211
220
310
621
635
Number                      Name                     Description and potential side effects                                              
E102                 Tartarzine                Colouring agent                 
(Syn)                 (Yellow)   
Histamine freeing agent, Asmatics should avoid.There is also a link to Hyperactivity in kids
 
E104                Quinoline                  Colouring Agent
(Syn)                 (Yellow)
Histamine freeing agent
 
E110               Sunset Yellow           Colouring Agent
(Syn)                (Yellow)                  
Histamine freeing agent, Asmatics should avoid There is also a link to Hyperactivity in kids when mixed with E210-215.
 
E123                Amaranth                 Colouring Agent
(Syn)                (Red)
Histamine freeing agent, Asmatics should avoid. There is also a link to Hyperactivity in kids when mixed with E210-215. Edvidence of  tumor delevopment in rats
Unapproved in Aust.
 
E124               Ponceau 4R              Colouring Agent
(Syn)               (Red)
Histamine freeing agent, Asmatics should avoid. There is also a link to Hyperactivity in kids when mixed with E210-215
 
E211             Sodium Benzoate       Preservative
(Min)
Has been know to cause pseudo-allergic reactions because its a histamine freeing agent
 
E220             Sulphur Dioxide          Antioxidant
(Min)
Asthmatics should avoid as it can trigger breathing difficulties. It has also been found to cause stomach upsets.
 
E310             Propyl Gallate              Antioxidant
(Syn)
Can cause stomach upsets, eczema & hyperactivity as it can be broken down in the intestines to gallic acid & octanol.
 
E621             MSG                              Flavour Enhancer
(Plant)
Gluten intolerant or Celiac's should avoid and children under 12weeks! Many side effects reported although not many proven.
 
E635            Disodium 5”-Ribonucleotides        Flavour Enhancer
(F,A,B)
Should be avoided by Asthamtics and people suffering from gout as it metabolises purines.
 
Key
(Syn) Synthetic based substance
(Min) Mineral based subtance
(plant) Plant based substance
(F,A,B) Fish, Animal, Bacteria based substance

Monday, 19 September 2011

Spring - Baked Lemon Chicken with Butter Bean Mash

Baked Lemon Chicken with Butter Bean Mash

Serving Size:
4 people

Ingredients:

  • 650g Chicken thigh fillets, trimmed
  • 1 large lemon, rind finely grated, juiced
  • 2/3 cup flat-leaf parsley leaves, chopped
  • 1/4 cup olive oil
  • 2 x 400g cans butter beans, drained, rinsed
  • 25g butter
  • 1/4 cup sour cream
  • 1 bunch steamed baby carrots, or other spring vegetables to serve
Method:
  1. Preheat oven to 200°C. Place chicken, lemon rind, 1/4 cup lemon juice, 2 tablespoons of parsley, oil and salt and pepper in a large snap-lock bag. Seal bag and gently shake until chicken is coated in marinade.
  2. Lightly grease a ceramic baking dish. Place chicken, in a single layer, in dish. Pour over marinade from bag. Bake chicken for 18 to 20 minutes or until cooked through.
  3. Meanwhile, combine beans, butter and sour cream in a saucepan. Using a potato masher, coarsely mash bean mixture. Place over medium heat. Cook, stirring occasionally, for 4 to 5 minutes or until heated through. Stir in remaining parsley. Season with salt and pepper.
  4. Serve chicken with bean mash and steamed carrots.


Spring - Asparagus Soup

Asparagus Soup

Asparagus is a favourite of mine and it's been a long time coming, the best part of Spring is all the fresh new vegies appearing in the markets, this delicious spring offering is so worth waiting for and this soup is one of my favourite ways of enjoying it.

Serving Size:
12 people

Ingredients:

  • 30g butter
  • 3 Spring Onions, white part only, thinly sliced
  • 1 large potato, peeled, finely chopped
  • 1 garlic clove, crushed
  • 1/2 cup dry white wine
  • 2 bunches asparagus, trimmed, finely chopped
  • 4 cups chicken or vegetable stock (for vegetarian option)
  • 1/4 cup pouring cream
  • Proscuito, to garnish (optional)
Method:
  1. Melt the butter in a large saucepan over medium heat. Add the spring onions, potato and garlic and cook, stirring, for 5 minutes or until spring onion softens.
  2. Add the wine and bring to the boil. Cook, stirring occasionally, for 1-2 minutes or until wine reduces by half. Add the asparagus and stock and bring to a simmer. Cook, stirring occasionally, for 5 minutes or until potato and asparagus are tender. Remove from heat. Set aside for 5 minutes to cool slightly.
  3. Transfer the soup to the jug of a blender or use a stick blender and blend until smooth. Return to the saucepan if needed and place over medium heat and cook, stirring, for 2 minutes or until heated through again. Add the cream and stir to combine. Taste and season with salt and pepper.
  4. Ladle soup among serving bowls. Top with a little crispy proscuito to be a little bit fancy and serve immediately.
  5. For the kids a Cheesy Crouton
    For the Adults Crispy proscuito and Proscuito wrapped Asparagus Spears